
Analyzing different sides of a 3D object with Azure Functions and Azure OpenAI
- Alibek Jakupov

- Mar 13, 2024
- 7 min read

GPT-4 Turbo with Vision represents an advanced leap in multimodal technology, expertly crafted by OpenAI. This cutting-edge Large Multimodal Model (LMM) seamlessly merges the intricacies of natural language processing with sophisticated visual comprehension, enabling it to interpret and analyze imagery with remarkable detail. With its adept capabilities, GPT-4 Turbo with Vision goes beyond mere observation, offering insightful, context-aware textual responses to a wide array of queries about the contents and nuances of visual data. Whether it's identifying objects, understanding scenes, or inferring intent, this model stands as a testament to the synergistic potential of combining visual and linguistic intelligence.
The current service only supports the upload of a single image per session, which restricts its functionality significantly. Enhancing the service to allow for the simultaneous upload and analysis of multiple images would be a notable improvement. This would enable users to examine and determine if a set of images, such as three photographs, depict various angles of the same object. Such a feature would greatly expand the service's utility and user experience.
Welcome to our comprehensive guide where we'll explore the process of batch uploading multiple images to GPT-4 Vision. What's even more exciting, we will delve into the steps to develop your very own web service that can handle multiple image uploads simultaneously, offering a variety of insights into the objects being examined.
Up we go!
Prerequisites
To successfully launch this demonstration, an active Azure Subscription is required. To create and deploy your GPT Vision model, please refer to the following quickstart guide for a setup process. For more details on GPT 4 Vision, refer to this guide. Important: see GPT-4 and GPT-4 Turbo Preview model availability for available regions.
Step 1: Create an Azure Function
Follow the steps in this documentation to make a simple Python Azure function. We need to use the V2 programming model, the http trigger, and call our function process_image.
The project structure should look this

Use Postman or a Web browser to try out your function and confirm that it works properly and your environment is up and running.


Step 2: Configure your Http request
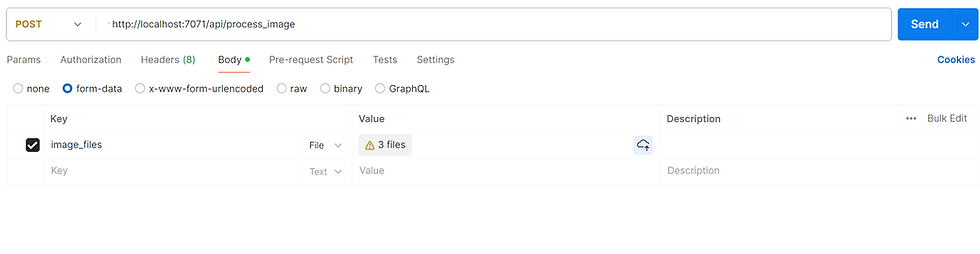
Our service is based on a simple concept. Suppose we want to analyze a 3D object. One of the easiest ways to do this is to upload several photos that show different sides of the object. The key thing in this tutorial is to learn how to set up your web client to be able to upload multiple images in one http request. If you set your request MIME type to application/octet-stream, you can upload a binary file like an image or a pdf document. But if you want to send multiple images, you'll need to set the MIME type to multipart/form-data, which will let you send multiple files at once. In postman, this is done via GUI. For more details, see this example. This is how the postman request looks for us.
Type: POST
URL: http://localhost:7071/api/process_image
Request type: form-data
Key: image_files
Value: your images that you upload via dialogue menu
Step 3: Get images from request body
You need to install some python packages that the service will use. To do this, open the requirements.txt file that Function Core tool created automatically, and add the following libraries.
azure-functions
openai
Pillow
Then import those libraries in your project
import azure.functions as func
import logging

from PIL import Image

import os
import base64

from mimetypes import guess_type

from openai import AzureOpenAI
Well, most of the work is done already. We just need to get the files from the request body, so we can process them and send them to GPT Vision. The HttpRequest has a files parameter, that lets us access all the files. Be careful, if you try to access your files directly by parameter name, for example, req.files["image_files"], this will only give you the last file. That's why we'll need to get an array of input files using the getlist function first. Here's the code :
image_files = req.files.getlist("image_files")But how do we teach the GPT Vision model that these are all pieces of the same image? Here’s the trick, we just join them together using the Pillow python library. Make a function concat_images that takes the list of images we made before as an input. Here it is:
def concat_images(image_files):
    images = []

    for image_file in image_files:
        image = Image.open(image_file)
        images.append(image)

    widths, heights = zip(*(i.size for i in images))

    total_width = sum(widths)
    max_height = max(heights)

    new_im = Image.new('RGB', (total_width, max_height))

    x_offset = 0

    for im in images:
        new_im.paste(im, (x_offset,0))
        x_offset += im.size[0]

    return new_im
In the main function, make a new variable that has the combined images in one image.
combined_image = concat_images(image_files)Now store the image on your device to check the appearance of the output.
image_path = "temp.png"
combined_image.save(image_path)
Keep in mind that this only works when testing locally. When we deploy our application, we will need to store our image in the tmp folder, which is recognized by Azure Functions. We store the image locally so that we can create a data url to send it to Azure OpenAI.
These are the pictures I send to the service.


And this is the final combined result

Step 4: Transfer the images to GPT 4 Vision
To begin with, obtain all your credentials from the Azure portal and in your local.settings.json, include the following variables.
GPT4V_ENDPOINT "the link to your service (usually in the following format https://<resource-name>.openai.azure.com/)"

GPT4V_KEY "the password for your service"

GPT4V_DEPLOYMENT "what you call your deployment. I usually use the same name as in the catalogue to make it easier to read, so in our case it is gpt-4-vision"
This is a common practice to prevent your keys from being revealed in the code. After deployment, you have to enter the keys in your Function App configuration settings.
Next, set up your prompt. You can give your user the option to specify their own prompt, so it's a good idea to create an extra input parameter, called user_prompt. If the user prompt is not set, we use the default value. By default, our service will check if all of the input images show the different sides of the same object or not. Here's an example of a prompt.
This is a single image composed of several images joined together. Please say if those images show the different sides of the same object or not. Explain your answer.And here's the code
user_prompt = req.params.get('user_prompt')
if not user_prompt:
    user_prompt = """
    This is a single image composed of several images joined together.
    Please say if those images show the different sides of the same object or not.
    Explain your answer.
    """
We need to make a function that creates a special url from the image content, because GPT Vision API only takes images in a certain format. This only works from local. When we try to get the byte stream in-memory directly from request body, the url is not in the right format. That's why we store the image locally and make the url like this.
def local_image_to_data_url(image_path):
    mime_type, _ = guess_type(image_path)
    if mime_type is None:
        mime_type = 'application/octet-stream'

    with open(image_path, "rb") as image_file:
        base64_encoded_data = base64.b64encode(image_file.read()).decode('utf-8')

    return f"data:{mime_type};base64,{base64_encoded_data}"
We can now proceed to set up our OpenAI client.
api_base = os.environ["GPT4V_ENDPOINT"]
deployment_name = os.environ["GPT4V_DEPLOYMENT"]
api_key = os.environ["GPT4V_KEY"]
api_version = '2023-12-01-preview'

client = AzureOpenAI(
    api_key=api_key,
    api_version=api_version,
    azure_endpoint=api_base,
)
Then submit the request and interpret the output
response = client.chat.completions.create(
    model=deployment_name,
    messages=[
        { "role": "system", "content": "You are a helpful assistant" },
        { "role": "user", "content": [
            {
                "type": "text",
                "text": user_prompt
            },
            {
                "type": "image_url",
                "image_url": {
                    "url": encoded_image_url
                }
            }
        ] }
    ],
    max_tokens=1000
)

output = response.choices[0].message.content
This is how the complete code appears. We’ve altered the image path, as we said before the image needs to be stored in the tmp folder when it is uploaded to the cloud.
import azure.functions as func
import logging

from PIL import Image

import os
import base64

from mimetypes import guess_type

from openai import AzureOpenAI


app = func.FunctionApp(http_auth_level=func.AuthLevel.ANONYMOUS)


@app.route(route="process_image")
def process_image_custom(req: func.HttpRequest) -> func.HttpResponse:

    user_prompt = req.params.get('user_prompt')
    if not user_prompt:
        user_prompt = """
	    This is a single image composed of several images joined together.
        Please say if those images show the different sides of the same object or not.
        Explain your answer.
        """

    image_files = req.files.getlist("image_files")
    combined_image = concat_images(image_files)


    api_base = os.environ["GPT4V_ENDPOINT"]
    deployment_name = os.environ["GPT4V_DEPLOYMENT"]
    api_key = os.environ["GPT4V_KEY"]
    api_version = '2023-12-01-preview'

    image_path = "/tmp/temp.jpg"

    combined_image.save(image_path)

    encoded_image_url = local_image_to_data_url(image_path)

    client = AzureOpenAI(
        api_key=api_key,
        api_version=api_version,
        azure_endpoint=api_base,
    )


    response = client.chat.completions.create(
        model=deployment_name,
        messages=[
            { "role": "system", "content": "You are a helpful assistant" },
            { "role": "user", "content": [
                {
                    "type": "text",
                    "text": user_prompt
                },
                {
                    "type": "image_url",
                    "image_url": {
                        "url": encoded_image_url
                    }
                }
            ] }
        ],
        max_tokens=1000
    )

    output = response.choices[0].message.content


    return func.HttpResponse(
        output, status_code=200
    )


def concat_images(image_files):
    images = []

    for image_file in image_files:
        image = Image.open(image_file)
        images.append(image)

    widths, heights = zip(*(i.size for i in images))

    total_width = sum(widths)
    max_height = max(heights)

    new_im = Image.new('RGB', (total_width, max_height))

    x_offset = 0

    for im in images:
        new_im.paste(im, (x_offset,0))
        x_offset += im.size[0]

    return new_im


def local_image_to_data_url(image_path):
    mime_type, _ = guess_type(image_path)
    if mime_type is None:
        mime_type = 'application/octet-stream'

    with open(image_path, "rb") as image_file:
        base64_encoded_data = base64.b64encode(image_file.read()).decode('utf-8')

    return f"data:{mime_type};base64,{base64_encoded_data}"
How about testing our service? For the 3 images at the start of this post, and the default prompt the result was like this:
All three images show different cars. This can be identified by the following features:

1. The license plates are different on each of the cars. On the first car the license plate is not visible, on the second car the license plate is "RSS 2474" and on the third car the license plate is not visible, but the differences in the context of the surroundings indicate that they are different locations.

2. The context of the surroundings of each vehicle is different. The surroundings and the location of other objects in each of the images are different, indicating that the photographs were taken at different times and locations.

3- The first and third images have bicycle racks on the roof of the car, but they have different designs and locations. This also suggests that they are different cars.

From these observations, we can conclude that although the cars are very similar in model and color, they are different cars.
Works like a charm.
Afterword
In this tutorial we explored some ways to send multiple images in one request to GPT 4 Vision, in order to process multiple images at the same time. There’re some possible enhancements for the service. For example, instead of using the API key, you can try using the Azure Managed Identity, which is the topic of our next article. Also, I recommend you to experiment with the prompt. The images we sent to the service have car model and numbers which may be sensitive data, and Content moderator may reject your request. You may clarify in the prompt that we are only trying to verify if the images show the same 3D object, and nothing more. Lastly, there may be some limits for the number of images we can join together. So far, we have tried with 3 images max. We’ll keep following the topic, keep an eye out.


Comments