
Azure Machine Learning with GitHub Actions : Tips and Tricks
- Alibek Jakupov

- Jun 14, 2023
- 7 min read

There's an excellent guide available on Microsoft Docs, which details the process of establishing a Continuous Integration and Continuous Deployment (CI/CD) pipeline using Azure Machine Learning within GitHub Actions. While the integration process with Azure DevOps may be more straightforward, incorporating Azure Machine Learning in GitHub Actions necessitates additional effort. As such, I find it vital to share valuable insights and techniques in this blog post. Without further ado, let us delve into the subject matter. We will look through each step and discuss them from the practical point of view.
Prerequisites
The Microsoft Docs tutorial recommends several prerequisites for the process: an Azure Machine Learning Workspace, Python SDK v2, and a GitHub account.
I would advise you to ensure that you possess adequate privileges on your Azure Subscription. This is crucial because access to Azure Active Directory is required for the creation of a Service Principal.
Get the Code
Microsoft suggests downloading the sample code from the official repository
https://github.com/azure/azureml-examplesRather than downloading the code, I recommend starting your own project from scratch. This approach prevents you from becoming overwhelmed with an excessive amount of data from various samples in the repository, which may be difficult to understand. Additionally, creating a project from the ground up enables you to have complete control over the process and develop a blueprint for your future machine learning endeavors.
Begin by creating an empty project. Next, establish two primary folders: 'cli' and 'infra'. Within 'infra', generate two subfolders called 'bootstrapping' and 'scripts'. Inside the 'cli' folder, create two empty files named 'run-job.sh' and 'setup.sh', along with a subfolder titled 'jobs/pipelines/<your-project-name>'.
In your project folder, add two YAML files: 'create-cluster.yml' and 'pipeline.yml', as well as two subfolders named 'src' and 'data'. For this example, I have adapted the NYC case and retained only the preparation step. Consequently, the 'src' folder contains merely a 'prep' subfolder with a single 'prep.py' Python script.
The Microsoft GitHub repository contains an 'infra' folder with several useful functions; however, you only require a few of them. To execute the example provided in the tutorial, which is based on NYC data, you will need the following files:
bootstrap.sh
init_environment.sh
sdk_helpers.sh
The 'scripts' folder includes just two scripts, and you will need both of them for this process:
call_all_scripts.ps1
remove_role_assignments.ps1
Copy the contents of the 'data' folder, without any change.
To set up the GitHub Actions workflow, first, check if the '.github/workflows' directory exists in your repository on GitHub. If it doesn't, create the '.github/workflows' directory.
Next, inside the '.github/workflows' directory, create a file named 'main.yml'. This file will be used to define the workflow for your project.
Your project structure should be organized in the following manner:
C:.
├───.github
│   └───workflows
│           main.yml
│
├───cli
│   │   run-job.sh
│   │   setup.sh
│   │
│   └───jobs
│       └───pipelines
│           └───<your-project-name>
│               │   create-cluster.yml
│               │   pipeline.yml
│               │
│               ├───data
│               │       greenTaxiData.csv
│               │       yellowTaxiData.csv
│               │
│               └───src
│                   └───prep
│                           prep.py
│
└───infra
    ├───bootstrapping
    │       bootstrap.sh
    │       init_environment.sh
    │       sdk_helpers.sh
    │
    └───scripts
            call_all_scripts.ps1
            remove_role_assignments.ps1
You may have noticed that we included a new file called 'create-cluster.yml'; as we proceed, we'll explore the reasons for its necessity.
Authenticate with Azure
After completing the steps in the tutorial, it's a good idea to verify a few things. Check your Azure Resource Group and Access Control (IAM) settings. Use the "Check Access" feature to see the access level of the service principal you assigned permissions to.
If no rights are assigned to your service principal, follow these steps to grant Contiributor access:
Navigate to your Azure Subscription.
Choose the subscription you want to modify.
Click "Add Role assignment."
Select the "Contiributor" role.
Assign the role to the service principal associated with your application.
By doing this, you ensure that your service principal has the necessary permissions to access the resources it needs.
Update setup
Here's the contents of my setup.sh file
az extension add -n ml -y

GROUP="PHD"
LOCATION="eastus"
WORKSPACE="phdwrkspc"

RESOURCE_GROUP_NAME=${RESOURCE_GROUP_NAME:-}
if [[ -z "$RESOURCE_GROUP_NAME" ]]
then
    echo "No resource group name [RESOURCE_GROUP_NAME] specified, defaulting to ${GROUP}."

    az configure --defaults group=$GROUP workspace=$WORKSPACE location=$LOCATION

    echo "Default resource group set to $GROUP"
else
    echo "Workflows are using the new subscription."
fi
Update pipeline
You will utilize a 'pipeline.yml' file to deploy your Azure Machine Learning pipeline. It's important to note that this refers to a machine learning pipeline rather than a DevOps pipeline.
$schema: https://azuremlschemas.azureedge.net/latest/pipelineJob.schema.json
type: pipeline

description: Sample job

display_name: base-pipeline-<your-project-name>
experiment_name: base-pipeline-<your-project-name>
jobs:
  prep_job:
    type: command
    inputs:
      raw_data:
          type: uri_folder
          path: ./data
    outputs:
      prep_data:
        mode: upload
    code: src/prep
    environment: azureml:AzureML-sklearn-1.0-ubuntu20.04-py38-cpu@latest
    compute: azureml:cpucompute
    command: >-
      python prep.py
      --raw_data ${{inputs.raw_data}}
      --prep_data ${{outputs.prep_data}}
For the simplicity we've left only single step.
The article claims that this update is only necessary if your computer cluster name is different from cpu-cluster, however, this is inaccurate. If you proceed without any changes following all the steps, your pipeline will encounter failure and display the subsequent error:
Response status code does not indicate success: 400 (User starting the run is not an owner or assigned user to the Compute Instance). User starting the run is not an owner or assigned user to the Compute Instance
On Azure ML only the creator of a specific compute instance is allowed to access it.
To resolve this problem, we have incorporated an extra step, which involves creating a compute cluster. To achieve this, insert the following code into the 'create-cluster.yml' file that we previously generated.
$schema: https://azuremlschemas.azureedge.net/latest/amlCompute.schema.json
name: cpucompute
type: amlcompute
size: STANDARD_DS3_v2
min_instances: 0
max_instances: 2
idle_time_before_scale_down: 120
location: eastus
To call this procedure, we will need to run the following code:
az ml compute create -f create-cluster.yml
We will see further where to add this command.
Run your GitHub Actions workflow
Your workflow carries out authentication with Azure, establishes the Azure Machine Learning CLI, and utilizes the CLI to train a model in Azure Machine Learning. The workflow file consists of a trigger segment and jobs:
A trigger initiates the workflow in the "on" section. By default, the workflow operates on a cron schedule and activates when a pull request is made from corresponding branches and paths.
In the "jobs" section of the workflow, you check out the code and sign in to Azure using your service principal secret.
The "jobs" section also features a setup action that installs and configures the Machine Learning CLI (v2). After the CLI installation, the "run job" action executes your Azure Machine Learning pipeline.yml file to train a model using NYC taxi data.
In the MS repository, navigate to .github/workflows/cli-jobs-pipelines-nyc-taxi-pipeline.yml and copy its contents. Next, we will incorporate the command to create a cluster, which we devised earlier, right before executing the pipeline command. Update your main.yml with the following code:
name: cli-jobs-pipelines-base-pipeline
on:
  workflow_dispatch:
  schedule:
    - cron: "4 6/12 * * *"
  pull_request:
    branches:
      - main
    paths:
      - cli/jobs/pipelines/<your-project-name>/**
      - infra/bootstrapping/**
      - .github/workflows/main.yml
      - cli/setup.sh
concurrency:
  group: ${{ github.workflow }}-${{ github.event.pull_request.number || github.ref }}
  cancel-in-progress: true
jobs:
  build:
    runs-on: ubuntu-latest
    steps:
    - name: check out repo
      uses: actions/checkout@v2
    - name: azure login
      uses: azure/login@v1
      with:
        creds: ${{secrets.AZURE_CREDENTIALS}}
    - name: bootstrap resources
      run: |
          echo '${{ github.workflow }}-${{ github.event.pull_request.number || github.ref }}';
          bash bootstrap.sh
      working-directory: infra/bootstrapping
      continue-on-error: false
    - name: setup-cli
      run: |
          source "${{ github.workspace }}/infra/bootstrapping/sdk_helpers.sh";
          source "${{ github.workspace }}/infra/bootstrapping/init_environment.sh";
          bash setup.sh
      working-directory: cli
      continue-on-error: true
    - name: run job
      run: |
          source "${{ github.workspace }}/infra/bootstrapping/sdk_helpers.sh";
          source "${{ github.workspace }}/infra/bootstrapping/init_environment.sh";
          az ml compute create -f create-cluster.yml
          bash -x ../../../run-job.sh pipeline.yml
      working-directory: cli/jobs/pipelines/hyas
Now on your github
Click on View runs.
Activate workflows by selecting I understand my workflows, go ahead and enable them.
Choose the cli-jobs-pipelines-base-pipeline workflow and opt to Enable workflow.
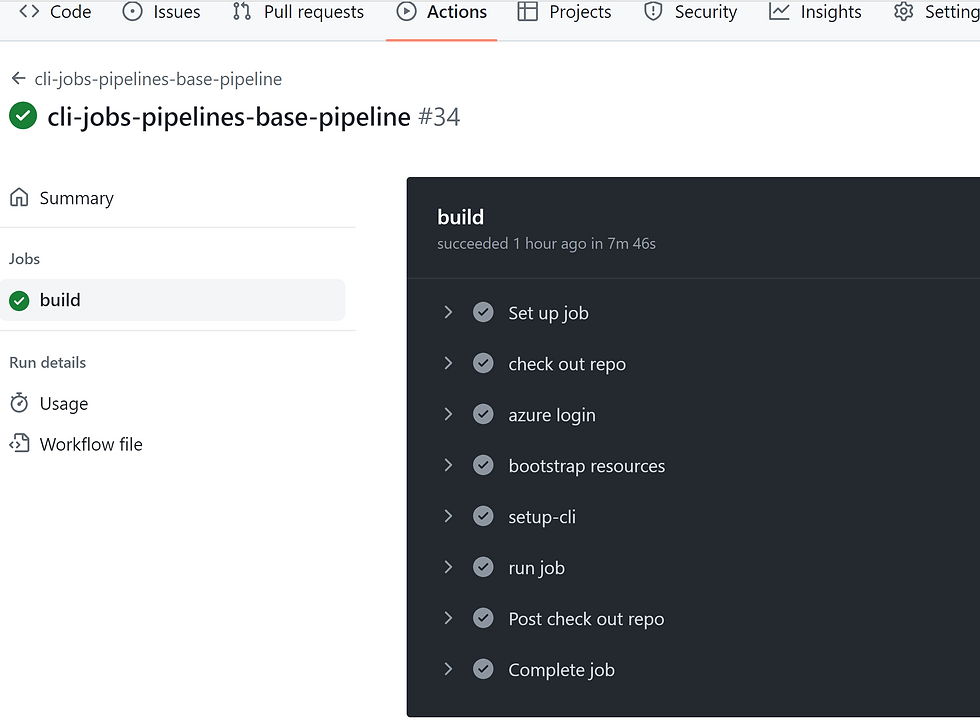
Congratulations, you've just set your CI CD pipeline up and running!
Note: I have made minor adjustments to the init_environment.sh script, as it is set up to create a new resource group if the environment variable is not specified. Thus, I've tweaked it for convenience.
#!/bin/bash

###################
set -o errexit
set -o pipefail
set -o nounset
# set -o xtrace # For debugging


###################
# REQUIRED ENVIRONMENT VARIABLES:
#
# PREFIX
# SUFFIX
# DATE_ONLY

###############

###################
# OPTIONAL ENVIRONMENT VARIABLES:
#
# RESOURCE_GROUP_NAME
# WORKSPACE_NAME
# SUBSCRIPTION_ID
# CPU_COMPUTE_NAME
# GPU_COMPUTE_NAME

###############

###################
# Names of parameters
###################

# Global variables
export MAX_RETRIES=60
export SLEEP_SECONDS=20

# default values for script invocation parameter
# export RUN_DEBUG=false               # -x
# export CONTINUE_ON_ERR=true         # -E  - true or false

# let "DATE_ONLY=`date +'%y%m%d'`"
# let "DATE_ONLY=$(date +'%y%m%U')"
# Add 10# to the front of variables to avoid the "Value too great for base" error when value has leading zeros.
# Ref: https://stackoverflow.com/questions/21049822/value-too-great-for-base-error-token-is-09
let "DATE_ONLY=10#$(date -d '+2 days' +'%y%m')"
let "REGISTRY_TODAY=10#$(date +'%m%d')"
let "REGISTRY_TOMORROW=10#$(date -d '+1 days' +'%m%d')"


export LOCATION="East US"
export PREFIX=aml
export SUFFIX=sdkv202
export APP_NAME="github-sp-amlsdkv2-gh"
export timestamp=$(date +%s)
export RESOURCE_GROUP_NAME="<MY-RG>"
export WORKSPACE_NAME="<MY-WRKSPC>"
export LOCATION="<MY-LOCATION>"


REGISTRY_NAME=${REGISTRY_NAME:-}
if [[ -z "$REGISTRY_NAME" ]]
then
    export REGISTRY_NAME="DemoRegistry${REGISTRY_TODAY}"
    echo_warning "No registry name [REGISTRY_NAME] specified, defaulting to ${REGISTRY_NAME}."
fi
export REGISTRY_NAME_TOMORROW="DemoRegistry${REGISTRY_TOMORROW}"

# Check if user is logged in
[[ -n $(az account show 2> /dev/null) ]] || { echo_warning "Please login via the Azure CLI."; az login; }

# ACR name must contain only small caps
export MOE_ACR_NAME="sdk${PREFIX}${SUFFIX}${DATE_ONLY}acr"

SUBSCRIPTION_ID=${SUBSCRIPTION_ID:-}
if [ -z "$SUBSCRIPTION_ID" ]
then
    # Grab the Azure subscription ID
    subscriptionId=$(az account show --output tsv --query id)
    # bash substitution to strip \r
    subscriptionId="${subscriptionId%%[[:cntrl:]]}"
    [[ -z "${subscriptionId}" ]] && echo_warning "Not logged into Azure as expected."
    export SUBSCRIPTION_ID=${subscriptionId}
    echo_warning "No Azure subscription id [SUBSCRIPTION_ID] specified. Using default subscription id."
fi

#login to azure using your credentials
az account show 1> /dev/null
if [ $? != 0 ];
then
    az login
fi

echo_title "RESOURCE_GROUP_NAME = \"${RESOURCE_GROUP_NAME}\" & LOCATION=\"${LOCATION}\" set as defaults. "
az configure --defaults group="${RESOURCE_GROUP_NAME}" workspace="${WORKSPACE_NAME}" location="${LOCATION}"  # for subsequent commands.
az account set -s "${SUBSCRIPTION_ID}" || exit 1

# AKS
# export AKS_CLUSTER_PREFIX="${AKS_CLUSTER_PREFIX:-amlarc-aks}"
export VM_SKU="${VM_SKU:-Standard_D4s_v3}"
export MIN_COUNT="${MIN_COUNT:-3}"
export MAX_COUNT="${MAX_COUNT:-8}"

# Extension
export EXT_AUTO_UPGRADE='false'
export RELEASE_TRAIN="${RELEASE_TRAIN:-staging}"
export RELEASE_NAMESPACE="${RELEASE_NAMESPACE:-azureml}"
export EXTENSION_NAME="${EXTENSION_NAME:-amlarc-extension}"
export EXTENSION_TYPE="${EXTENSION_TYPE:-Microsoft.AzureML.Kubernetes}"
export EXTENSION_SETTINGS="${EXTENSION_SETTINGS:-enableTraining=True enableInference=True allowInsecureConnections=True inferenceRouterServiceType=loadBalancer}"
export CLUSTER_TYPE="${CLUSTER_TYPE:-connectedClusters}" # or managedClusters


# ARC Compute
# export WORKSPACE="${WORKSPACE:-amlarc-githubtest-ws}"  # $((1 + $RANDOM % 100))
export ARC_CLUSTER_NAME="${ARC_CLUSTER_NAME:-amlarc-inference}"
export ARC_COMPUTE_NAME="${ARC_COMPUTE_NAME:-inferencecompute}"
export INSTANCE_TYPE_NAME="${INSTANCE_TYPE_NAME:-defaultinstancetype}"
export CPU="${CPU:-1}"
export MEMORY="${MEMORY:-4Gi}"
export GPU="${GPU:-null}"
export CPU_INSTANCE_TYPE="2 4Gi"
export GPU_INSTANCE_TYPE="4 40Gi 2"

export VNET_CIDR="${VNET_CIDR:-10.0.0.0/8}"
export MASTER_SUBNET="${MASTER_SUBNET:-10.0.0.0/23}"
In this tutorial, we have examined the MS tutorial on constructing a basic CI/CD pipeline using Azure ML and GitHub Actions. As you may have noticed, there are some complex configurations required to make everything function smoothly. I hope you found this tutorial helpful and informative. May the force be with you!


Comments